A soaker can be a mix of grains and seeds or a single variety of grain or seed that is mixed with water and left to soak for several hours before being added to bread dough.
It is a great method for adding whole grains and seeds to your bread making it more nutritious and tasty. Besides just nutritional value and flavour, it also helps the bread retain more water and stay fresh for longer.
Soakers can be made with pretty much any seed or grain you could imagine. Anything that can be used in cooking can easily be added to bread dough.
The main reason for soaking grains and seeds is to make them palatable. Imagine biting down on a piece of barley. It would most likely break your tooth. Another important reason for soaking is to prevent the seeds and grains from stealing water from the dough and drying it out in the process. I’m sure we have all one time, or another added a bunch of seeds to a recipe just find that the dough became stiff and dry.
There are two types of soakers – cold and hot.
A cold soaker is made with cold or ambient temperature water. This kind of soaker usually consists of softer grains like oats and cornmeal, and seeds. Such grains and seeds do not require much, or any cooking and they do not take a long time to soak either. Cold soakers can be made in as little as 30 minutes, but they can be left to soak for several hours.
A hot soaker is made with hot or boiling water. This kind of soaker usually consists of hard whole or cracked grains like barley, wheat, millet, buckwheat etc. These kinds of grains can take several hours to soften and hydrate properly.
To soak the grains and seeds well you should use at least and equal part of water to grain and seed mix. It is advisable to use more to hydrate the mix properly. I generally tend to soak at a 1:1.5 ratio.
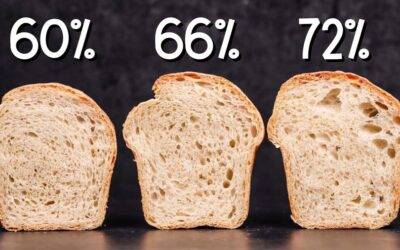
The grains and seeds in the soaker along with the flour in a recipe make up 100% in baker’s percentage terms. So, to get a correct hydration percentage you must calculate the amount of water in relation to both ingredients unlike in all other recipes where only the flour makes up 100%. Example – 500g flour + 100g grains = 600g. Such a dough with 70% hydration would then contain 420g water (600×0.7=420). If you only accounted for the flour, then it would end up being 58% hydration which would be way too dry.
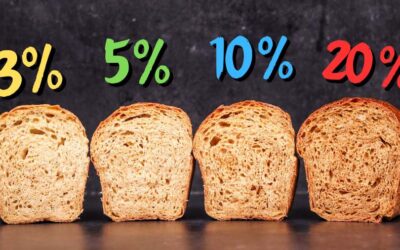
When preparing a soaker in a warm kitchen and leaving it to sit at room temperature for a long time there is a risk of it developing some off flavours due to enzymatic activity. This can be controlled by adding part of the salt of the recipe to the soaker. 2% in relation to the amount of seeds and grains is sufficient. This will not only slow enzymatic activity, but also season the mix to make it more flavourful.
Although it is not always necessary, adding salt is a good insurance policy just in case. Another way to slow enzymatic activity is by refrigerating the soaker. A cold soaker can be refrigerated right away, but a hot soaker should be left to cool down to room temperature before refrigeration.
Temperature control must be kept in mind when using a soaker. Since it makes up a significant part of the dough it will partly dictate the final temperature. If the soaker is cold and if your kitchen is cold, then the final dough temperature will be quite low. Similar temperature control measures apply to preferments, so you can use it as a guide.
At which point in the process should a soaker be added to the dough? There are two options – you can add it at the beginning of the mix along with the other ingredients or you can add it once the dough has been kneaded for a few minutes to develop gluten.
Since I mix by hand, I always add the soaker from the get-go. The seeds and grains have a shearing effect on the gluten, and it can take longer to mix this way, but I prefer it because I do not have to stop and add anything to the dough halfway through the mix.
I have seen recipes that include hot soakers made with part of the flour of the recipe. The boiling water gelatinizes the starch of the flour, and it has a great effect on the final loaf. It makes the crumb soft and bouncy. For this reason, I would not call it a soaker. It is sometimes known as a ‘scald’. There will be a separate episode on this in the future.
Ingredients
For the soaker –
90g (3.2oz) grains and seeds of your choice
200g (7.05oz) boiling water
2g (0.07oz) salt
For the preferment –
80g (2.8oz) whole wheat flour
20g (0.7oz) whole (dark) rye flour
Pinch of yeast (0.1g or 0.004oz)
100g (3.5oz) water at around 20C (68F) if your kitchen is between 20C – 24C (68F – 75F). If it is warmer or cooler you may need to decrease or increase the water temperature by a couple of degrees.
For the main dough –
200g (7.05oz) white bread flour
100g (3.5oz) whole wheat flour
7g (0.25oz) salt
4g (0.14oz) instant dry yeast or 4.8g (0.16oz) active dry yeast or 12g (0.42oz) fresh yeast
10g (0.35oz) malt syrup, honey, or any other sweet syrup *optional
Poppy seeds to cover.
Method
- Make the soaker. Combine the grains, seeds, salt, and boiling water. Cover and leave to soak. I refrigerated my soaker after it cooled down to control the final dough temperature.
- Make the preferment. Combine the water, pinch of yeast, rye flour, and whole wheat flour. Mix until there is no dry flour left. Cover and ferment for 10 – 16 hours. *If you are not ready to make the dough by the time the preferment is ready, then you can refrigerate it and use it up to 12 hours later. In this case you should remove the soaker from the fridge to come up to temperature otherwise your dough may be too cool if made with a cold soaker and a cold preferment.
- Make the dough. In a large bowl combine the soaker, yeast, salt, malt syrup, and preferment. Mix well. Add the remaining whole wheat and white flour. Mix to a dough.
- Tip the dough out on the table and knead for 3 minutes. This dough is relatively dry and since I baked in a tin, it did not require more kneading. *Desired dough temperature 23C (73F). If your dough is warmer, then it will ferment more rapidly. If it is cooler, then it will take longer. Adjust proofing time accordingly.
- Cover and ferment for 2 hours.
- Shape into a loaf and coat with seeds *optional.
- Place in a 1kg loaf tin. Cover and proof for 1.5 hours or until well puffed up. *During the final hour of fermentation preheat your oven to 220C (430F) fan off.
- Bake for 35 minutes.
Leave to cool down and enjoy!
Keep in mind that the conditions in each kitchen are different, so fermentation times may vary for you. It is up to the baker to control the bread and react accordingly.
Your oven may be different too, so your baking time may vary.
Watch the video here