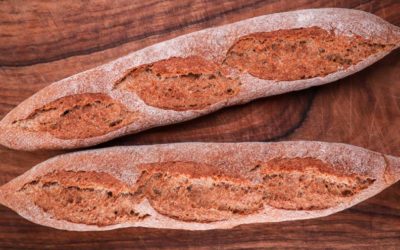
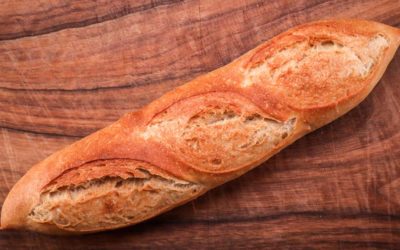
Miche or pain de campagne is an old-style French country bread.
The reason for its large size is the fact that back in the old days most people did not have ovens at home. Bread dough would be made at home and brought to the village bakery or communal oven to be baked. This was not a daily occasion, so the bread had to feed a whole family for several days or even up to a couple of weeks.
The miche made with this recipe is only 2kg (4.4lb). They can get multiple times larger.
An advantage of such a large bread is its ability to retain moisture thus keeping it fresh for longer. In fact, the larger the bread the slower it will stale.
It is usually made with a sourdough starter, but in this recipe, we replace it with a yeasted preferment which works similarly. It provides a lot more flavour than a straight-through dough and it adds acidity which will prevent the bread from becoming mouldy.
Another unique characteristic of a large bread that is kept for a long time is the way it develops flavour as the days go by. It becomes more complex with age. It will stale just like every other bread, but it will stay soft for several days and even after a week it will be still perfect for toasted sandwiches.
You could bake this huge loaf, cut it into 2 or 4 pieces and share it with someone.
Best kept in a bread box or wrapped in paper to extend its shelf life. Do not wrap a bread like this in plastic wrap or palace it in a plastic bag as the moisture in the loaf may promote mould growth.
You will need a large tray, baking stone, or baking steel. A large pizza paddle or cookie sheet will help with moving this loaf to the oven. If your oven and other baking equipment are not large enough, then you can reduce the amount of ingredients by 1/4 or 1/3.
Watch the video down below for detailed instructions.
Ingredients
For the preferment –
200g (7.05oz) high protein wholegrain wheat flour
130g (4.6oz) water at room temperature if your kitchen is between 22C – 24C (72F – 75F) *
Pinch of yeast
*To learn more about dough temperature control click here.
For the autolyse –
900g (2lb) high protein wholegrain wheat flour
740g (1.65lb) water at room temperature
22g (0.77oz) salt**
To finish the dough –
30g (1.05oz) water at room temperature
10g instant dry yeast or 12g (0.42oz) active dry yeast or 30g (1.05oz) fresh yeast
Method
- Make the preferment. In a bowl combine the water and yeast. Mix to dissolve. Add the flour and mix until there is no dry flour left. Cover and leave to ferment for 12 hours. If your kitchen is warmer, it will ferment more rapidly. If you are not ready to make the final dough by the time the preferment has fully fermented, then place it in the fridge to slow the fermentation. That is what I did. To learn more about dough temperature when using a preferment click here.
- Make the autolyse. In a large bowl combine the water, preferment, and flour. Mix well until there is no dry flour left. Sprinkle the salt over the dough and pat it down with a wet hand. **Autolyse is normally performed without salt as the salt would hinder gluten formation. Sprinkling it over the top does not affect it enough to cause any significant damage.
- Leave to hydrate for 30 minutes.
- Dissolve the yeast in the remaining water and pour onto the dough. Work the mix until the yeast has been absorbed. *If you are using active dry yeast you may need to dissolve the yeast in the water 10 minutes earlier to make sure it is ready to be used.
- Tip the dough out on the table and knead using the stretch & fold method for 10 – 12 minutes. *Desired dough temperature 25C (77F). If your dough is warmer, then it will ferment more rapidly. If it is cooler, then it will take longer. Adjust proofing time accordingly.
- Cover and ferment for 35 – 40 minutes. This dough can ferment quite quickly.
- Give it a coil fold on all sides.
- Ferment for another 35 – 40 minutes.
- Pre-shape.
- Leave to rest for 20 minutes. *During this time start preheating your oven, baking tray, and a tray for water to 250C (482F) fan off.
- Final shaping. Place the loaf on a large square of non-stick paper.
- Final proof may take as little as 30 minutes. A large dough ferments more rapidly than a smaller one.
- Score the dough and carefully place it in the oven. Pour 1 cup of boiling water onto the preheated tray to create steam. Be extremely careful when doing this. It is easy to scald your hands forearms. Use oven gloves. Also, do not pour any water on the oven door glass because it may shatter!
- Turn the heat down to 200C (392F) and bake the loaf for 1 hour turning it around for an even bake. It the top is getting too dark, then cover it with tin foil.
- Leave to cool down for at least 12 hours before cutting into it.
Enjoy your gigantic bread that will only get better as the days go by ?
Keep in mind that the conditions in each kitchen are different, so fermentation times may vary for you. It is up to the baker to control the bread and react accordingly.
Your oven may be different too, so your baking time may vary.
Watch the video here