You can find a couple of regular baguette recipes on my channel. They use the exact same principles as this version, so if you have made baguettes before, then you will be able to make these too.
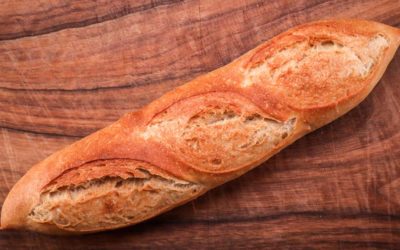
I thought a whole wheat version would be quite unique and interesting. The result was surprisingly good. The crust of the baguette was crispy, and it had a great flavour. It was denser than my white flour baguettes, but that can be adjusted by increasing the hydration.
Although the hydration of this dough is 80% it still came out a little heavier than I expected, but I was happy with the result regardless. If you want to make them, then I would suggest first following my recipe and then adjusting from there if need be.
Things to know when making baguettes.
If for some reason you are not ready to make the bread at that point or you realize that you will not have time to do it just before it is ready, then simply refrigerate it. The preferment can be kept in the fridge safely for about 12 hours and then used as per recipe. Just keep temperature control in mind since a cold poolish will bring down the final dough temperature.
Final shaping is one of the crucial parts. There are various techniques, and they change according to the dough hydration too. The main goal is to create tension and not to degas the dough too much.
Good scoring makes good ears. Ears are the distinct cuts you see on baguettes. Many breads that are scored have ears. What makes the ears of a baguette special are their distinct curved shape. It is achieved by using a razor blade attached to a handle called a lame.
The curved blade ensures that the cut does not go straight down into the dough rather it curves underneath one side of the cut. This makes it lift and open in a particular way.
You can make your own handle from a chopstick; popsicle stick or even a wooden coffee stirrer. Be careful not to slice your fingers!
The blade however does not do the job by itself. It is in the way you slice the dough that gives it a good look. Imagine there is a 1 inch (2.5cm) wide line running down the middle of the loaf. Slice it within that boundary and overlap each cut by 1/3.
Equipment is important. The lame with a razor blade is just one piece to the puzzle.
Final proofing in bakeries is done on a piece of thick cloth called a couche. It is in between the folds of which the baguettes rest. It helps them keep their shape and prevents them from spreading out and sticking to each other. At home you can use a clean towel.
To move the baguettes from the couche a baguette peel is used. It is usually a flat piece of wood. It ensures that the baguettes keep their shape. At home you can use a piece of cardboard cut to the right size.
Steam is extremely important when baking baguettes. It will moisten the surface and prevent it from drying out too soon in the oven. This will ensure that the baguettes rise to their full potential. Steam also prevents the crust from becoming too thick and it makes it extra crispy. Colour and shine are improved too. To create steam, you can place a tray in the oven to heat up and pour half a cup of boiling water in it as soon as the baguettes go in.
A solid base for baking. Any bread should be ideally baked on a hot solid base. It makes the loaf jump up and expand as it hits the oven. You can use a baking steel, a baking stone, or a thick metal tray.
This recipe makes two demi baguettes. To make more multiply the amounts of ingredients.
Watch the video down below for detailed instructions.
Ingredients
For the preferment –
80g (2.8oz) whole wheat bread flour
60g (2.1oz) water at room temperature About 20C – 24C (68F – 75F). If your kitchen is cooler or warmer adjust the water temperature up or down or keep the poolish in a cooler or warmer area.
0.1g (0.0035oz) instant dry yeast or 0.12g (0.004oz) active dry yeast or 0.3g (0.01oz) fresh yeast. I normally just add a pinch. That seems to equal about 0.1g most of the time.
If you are using active dry yeast, then you may need to let it sit in the water for 10 minutes before adding the other ingredients or else it could take a lot longer to raise the dough.
For the main dough –
200g (7.1oz) whole wheat bread flour
164g (5.8oz) cool water*
6g (0.2oz) salt
2g (0.07oz) instant dry yeast or 2.4g (0.085oz) active dry yeast or 6g (0.21oz) fresh yeast
To learn more about dough temperature when using a preferment click here.
The four I use has a protein content of 13%. If your flour is weaker, then you may need to lower the hydration.
Method
- Make the preferment. Combine the water and the yeast. Mix to dissolve the yeast. Add the flour and mix until there is no dry flour left. Cover and ferment for 10 – 12 hours.
- Make the dough. In a large bowl combine the water, yeast, salt, and preferment. Mix well to hydrate the yeast and dissolve the salt. Add the flour and mix until there is no dry flour left.
- Tip the dough out on the table and knead for 10 minutes using the slap & fold method. *Desired dough temperature around 25C (77F). If your dough is warmer, then it will ferment more rapidly. If it is cooler, then it will take longer. Adjust proofing time accordingly.
- Cover and ferment for 45 minutes.
- Fold.
- Ferment for 45 minutes.
- Divide in two equal pieces. Pre-shape and rest for 15 minutes.
- Final shaping.
- Place the baguettes on the couche and cover.
- Final proof 1 hour. *During this time preheat the oven, baking steel and steaming tray to 250C (480F) fan off.
- Score the baguettes and place them in the oven. As soon as you slide them into the oven pour half a cup of boiling water in the steaming tray. Turn the temperature down to 210C (410F).
- Bake for about 22 minutes.
Leave to cool down slightly and tuck in!
Keep in mind that the conditions in each kitchen are different, so fermentation times may vary for you. It is up to the baker to control the bread and react accordingly.
Your oven may be different too, so your baking time may vary.
Watch the video down below for detailed instructions.
Watch the video here