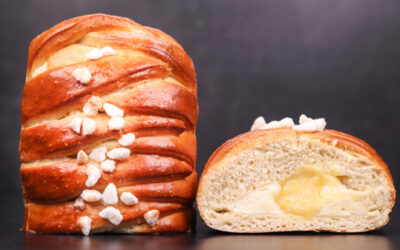
This fun sized babka is awesome and it is super easy to make. The four-strand braid will make you look like a pro even though it is the easiest thing in the world.
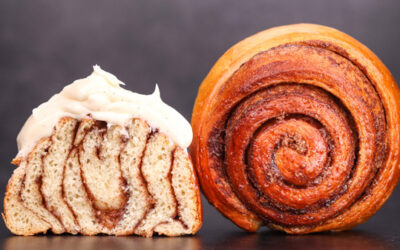
Soft and fluffy dough layered with a rich cocoa filling. You can customize it to your taste by choosing a different filling. The only thing to look out for is consistency as a runny filling will turn this into a nightmare.
If you have made babka, then you will be familiar with the process. Of course, there could be many variations to the dough. I chose a relatively low hydration, not too much fat and sugar and no preferments or sponge to make things as easy as possible.
You just need a few basic ingredients, which a lot of you will most likely have at home and you will need a few hours of waiting time. There is not much to say about this one.
The soft brown sugar used in each part of this bread gives it a nice richness and the glaze makes them shine with a dark brown colour.
I am using individual muffin moulds, but you can certainly use a muffin tin. Adjust the size of the buns accordingly. If your moulds are smaller, then make more buns out of this dough. On the other hand, if they are bigger, then you can cut the dough into less pieces.
This recipe makes 6 decently sized muffins. Multiply the amount of ingredients to make more.
Watch the video down below for detailed instructions.
Ingredients
For the dough –
250g (8.8oz) all-purpose flour
5g (0.17oz) salt
25g (0.9oz) soft brown sugar
25g (0.9oz) soft butter
3g (0.1oz) instant dry yeast or 3.6g (0.12oz) active dry yeast or 9g (0.3oz) fresh yeast
135g (4.75oz) cold milk *
*To learn more about dough temperature control click here.
For the filling –
50g (1.75oz) soft butter
80g (2.8oz) soft brown sugar
10g (0.35oz) cocoa powder
2g (0.07oz) cinnamon
For the syrup –
30g (1oz) soft brown sugar
25g (0.9oz) water
*Bring these up to a boil just before the buns come out the oven.
Method
1. Make the filling. Combine the sugar, butter, cocoa powder, and cinnamon. Mix well until you have a spreadable paste. Cover and leave on the side for later.
2. In a large bowl combine the milk, yeast, salt, and sugar. Stir well to dissolve any large salt and sugar crystals, and to hydrate the yeast. Add the butter and the flour. Mix to a dough.
3. Tip the dough out on your table and knead it for around 5 minutes. *Desired dough temperature 25 – 26C (77 – 79F). If your dough is warmer, then it will ferment more rapidly. If it is cooler, then it will take longer. Adjust proofing time accordingly.
4. Cover and ferment for 1 – 1.5 hours.
5. Fold.
6. Ferment for another 1 – 1.5 hours. During the second proof you will be able to accurately judge the fermentation. The dough should double in volume and be nice and airy when done.
7. Roll the dough out to a large rectangle. Try and make it as straight as you can.
8. Spread the filling all over leaving a little strip of dough at the top uncovered. Brush the strip with water.
9. Visually divide the dough into 3 equal parts horizontally. Fold the bottom third up carefully and as evenly as you can. There is no need to rush any of these steps. Fold the top third down and seal the dough by pressing it lightly.
10. Trim the two sides to make it neater. Now cut the dough into 6 equal pieces. Cut each piece into 4 strips.
11. Braid the buns. Watch the video for a good idea on how this is done. There is no point in me trying to explain it in writing as that would only create confusion.
12. Place your braided buns in greased moulds.
13. Cover and ferment for 1.5 – 2 hours or until well puffed up. You can see how much they rose in the video. *During the final hour of fermentation preheat your oven to 170C (340F) fan on. If your oven is quite strong, then reduce the temperature to 160C (320F) to be safe.
14. Bake the buns for around 25 minutes.
15. Brush with the hot syrup as soon as they come out the oven.
16. Leave them to set for 10 minutes before removing from the moulds. This will prevent them from getting distorted.
Tuck in and enjoy!
Keep in mind that the conditions in each kitchen are different, so fermentation times may vary for you. It is up to the baker to control the bread and react accordingly.
Your oven may be different too, so your baking time may vary.
Watch the video here