I never buy bread and I’m sure if you are one of my subscribers, then most likely neither do you.
Baking your own bread is a rewarding and relaxing activity. Whether you follow a recipe or create a new one, the result will always be better than any of the mass-produced breads you can find in the supermarket.
The idea for this video came from curiosity. I walked down the bread aisle in my local shop and saw a full-sized loaf of whole wheat bread for just £1 ($1.25) and it got me thinking whether I could make something similar for the same price.
Mass produced bread.
Of course, big bread factories have buying power and they buy in bulk, so the ingredients they use do not cost them a lot. The process is almost fully automated too, so there is not much labour cost attached to it either.
The bread is made with cheap ingredients and additives. The automated process practically skips through fermentation, so a loaf can go from raw ingredients to being packaged in about an hour. The quick process is reflected in the lack of flavour. It also ensures that the flour is not broken down and makes the bread less digestible and less nutritious.
Texture wise it can be quite deceiving. The bread is incredibly soft and pleasant to squeeze. And it can stay soft for several days unlike homemade bread. Who knows what additives they use to achieve this softness? I guess that and the price are the appealing parts of it. But when you take a slice out of the bag and give it a good squeeze it turns into a piece of putty and feels like a raw piece of dough.
You can’t buy a lot for £1 these days.
Ingredients are not cheap. Especially if you want decent quality. I bought the same ingredients that I use in most of my videos without calculating anything beforehand just to see whether I could get below the £1 mark.
I will not be including the cost of electricity from running the oven because that will easily double the price of the bread. I figure if you bake at home, then you most likely do not do it purely for the savings. A lot of things that we love cost money, so this should be a price you are willing to pay. I mean you don’t buy a car and then just look at it, right? It also needs fuel to be enjoyed.
There are things you could do to offset the cost of electricity. You can buy cheaper ingredients and not necessarily compromise on quality. You can buy in bulk and save money that way. You can bake more breads at the same time to reduce the cost of fuel per loaf.
My process of working out the ingredients.
I checked the label of the bread to see what the ingredients were and how much the loaf weighed. It contained whole wheat flour, water, salt, oil, yeast, and several additives which we will not be needing. It weighed 800g (1.75lb).
Considering evaporation during baking I thought I would need around 915g (2lb) dough.
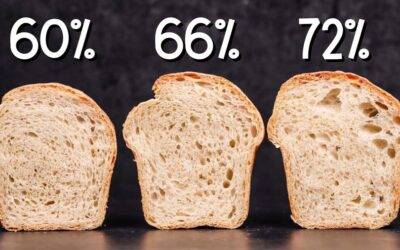
Since it was 100% whole wheat, I decided on a hydration of 80%. The salt content on the shop-bought bread label was around 1%, so I stuck to the same and I also decided on 1% yeast since I would be using a preferment and that would make it more than enough.
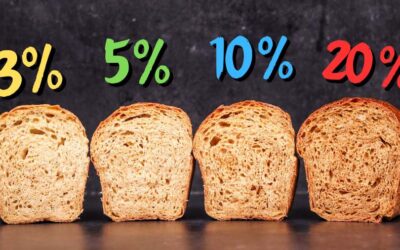
Finally, the bread that I bought contained 3% sunflower oil. I opted for 5%.
I do realize that the percentages indicated on the label are not baker’s percentage values.
If you watched my How to Calculate Individual Bread Dough Ingredients for a Certain Dough Mass video, then you would know how to calculate the weight of each ingredient using the total amount of dough and the chosen baker’s percentage values.
In short, you must add up the percentages and then divide the total dough mass by that number to find out the weight of 1% of the dough. Then multiply that weight by each ingredients’ percentage to find out how much it should weigh. I normally just calculate the amount of flour and then all other ingredients in relation to it. The flour is 100%.
- 100 + 80 + 1 + 1 + 5 = 187
- 915 : 187 = 4.893 (we round this up to 4.9 to simplify) So, 4.9g is what 1% of this dough weighs.
- Flour 100 x 4.9 = 490g
- Water 490 x 0.8 = 392g (I rounded this down to 390g to make the recipe look nicer)
- Yeast 490 x 0.01 = 4.9g (This was rounded up to 5g for the same reason as above)
- Salt 490 x 0.01 = 4.9g (Rounded up to 5g)
- Oil 490 x 0.05 = 24.5g (Rounded up to 25g)
- Total dough 490 + 390 + 5 + 5 + 25 = 915g
As you can see the calculations are simple and you can round the numbers up or down to your liking. I prefer a recipe that looks nice and neat, but each to their own. If you want to stick to your chosen percentages, then do not deviate too much from the resulting numbers.
Calculating the cost.
The flour I used cost 15.7 pence per 100g.
The yeast cost 125 pence per 100g.
The salt cost 80 pence per 100g.
The oil cost 30 pence per 100g.
I used tap water, so it cost nothing.
Knowing these numbers, we simply multiply each by 4.9 and the total cost of the ingredients came to 94.68 pence.
The electricity would cost me around 60 pence per hour or at least that is what the internet tells me, so that would double the cost of the bread.
Looking at cheaper ingredients I found that flour could be 7 pence per 100g, salt could be 16 pence per 100g, and the oil could be as low as 15 pence per 100g. Using these would halve the cost of the ingredients and you would still end up with bread that is better for you.
Coming up with a recipe.
I was not trying to recreate the loaf that I bought. That will be a project for another video. But I did want to make a sandwich bread which was nice and soft and would stay soft for longer than a regular bread. Taste was also important.
I chose to use a preferment which would provide the flavour and I chose a dough improver (yudane) to give it softness and longevity. You can find more information about preferments here and you can find out more about dough improvers here.
This loaf ended up weighing around 800g (1.75lb). It had a nice soft crumb and a slightly chewy crust. It tasted like a nice whole wheat sandwich loaf. Not too strong. It was not nearly as soft as the store-bought bread, but that is not what I was trying to achieve. That thing was so squishy that spreading butter on it would just tear a hole in the crumb.
Watch the video down below for detailed instructions for this recipe.
The Recipe
For the yudane –
190g (6.7oz) whole wheat flour
190g (6.7oz) boiling water
For the preferment –
100g (3.5oz) whole wheat flour
100g (3.5oz) water at around 20C – 24C (68F – 75F)
0.1g (0.0035oz) instant dry yeast or 0.012g (0.004oz) active dry yeast or 0.3g (0.01oz) fresh yeast
I usually do not weigh the yeast. One small pinch is around 0.1g.
For the main dough –
200g (7.05oz) whole wheat flour
100g (3.5oz) water at around 20C – 24C (68F – 75F)
5g (0.17oz) salt
5g (0.17oz) instant dry yeast or 6g (0.21oz) active dry yeast or 15g (0.52oz) fresh yeast
25g (0.9oz) oil
If you are using active dry yeast, then you may need to let it sit in the water for 10 minutes before adding the other ingredients or else it could take a lot longer to raise the dough.
The flour I use has a protein content of 13%. If your flour is weaker, then you may need to lower the hydration.
To learn more about dough temperature control click here.
Method
- Make the yudane. In a large bowl combine the boiling water and the flour. Mix until there is no dry flour left. Place in a clean bowl, cover and leave in the fridge until needed.
- Make the preferment. Combine the water, yeast, and flour. Mix until there is no dry flour left. Cover and leave to ferment at room temperature for 10 – 12 hours.
- Make the dough. In a large bowl combine the yudane, preferment, water, yeast, salt, and oil. Mix well. Add the remaining flour and mix to a dough.
- Tip the dough out on the table and leave to rest for 15 minutes. This will make it easier to knead.
- Knead the dough using the slap & fold method for 10 minutes. *Desired dough temperature 24C – 25C (75F – 77F). If your dough is warmer, then it will ferment more rapidly. If it is cooler, then it will take longer. Adjust proofing time accordingly.
- Cover and ferment for 30 minutes.
- Fold.
- Cover and ferment for 30 minutes.
- Pre-shape and rest for 15 minutes.
- Final shaping. Place in a 900g (2lb) loaf tin.
- Final proof around 40 minutes. This dough is very quick to ferment because of the preferment. *During this time preheat the oven to 160C (320F) fan on.
- Brush the loaf with egg. This is optional, but I like the shiny glaze. The amount of egg used for the glaze would not even add 1 penny to the cost of the loaf.
- Bake the loaf for 40 minutes.
Keep in mind that the conditions in each kitchen are different, so fermentation times may vary for you. It is up to the baker to control the bread and react accordingly.
Your oven may be different too, so your baking time may vary.
Watch the video here