Regular brioche with its 40% – 50% butter is already quite rich. But I wanted to see whether a 100% butter dough would even be possible to make. It totally is!
Any fat that is added to bread dough inhibits gluten formation. The more fat is added the more difficult it is to develop the gluten and the longer it takes to a achieve sufficient gluten strength. For this reason, even regular brioche can take 25 minutes of mixing.
The longer a dough is mixed the more it warms up. Temperature control is extremely important in breadmaking, so all ingredients for this dough must be stone cold.
I have spoken extensively about both points in the videos of the Brioche and Principles of Baking playlists on my channel, so I will not get too deep into it here. I will assume that you know the principles of making brioche.
To keep the temperature in check I froze the flour and the mixing bowl and used cold eggs and cold butter. The kneading step took quite some time to say the least. 10 minutes of initial kneading to bring the dough together and 30 minutes after adding the butter.
At first it felt hopeless and seemed like I was kneading a pile of porridge, but it all came together after all. It always does.
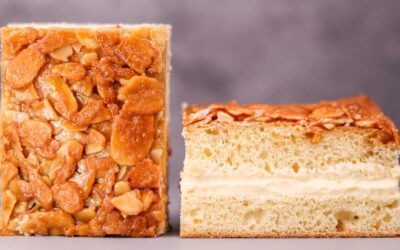
The main purpose of this video was to show that it is possible. Would I recommend recreating it? Yeah, for a bit of fun and as an exercise. Perhaps you can shock some people when you let them try this ultra-rich bread. It’s like an amazingly soft sponge soaked in butter. There is no other way to describe it. I’m definitely not making it again, but it was worth it!
You may notice that there is a high amount of salt in the formula. This is for proper balance of flavour since there is so much fat.
Watch the video down below for detailed instructions.
Ingredients
300g (10.6oz) white bread flour, cold
300g (10.6oz) butter, cold
180g (6.35oz) eggs, cold
8.5g (0.3oz) salt
40g (1.4oz) sugar
5g (0.17oz) instant dry yeast or 6g (0.21oz) active dry yeast or 15g (0.52oz) fresh yest
Method
- Make sure all the ingredients are cold. If they are not, then the dough will become too warm and over ferment during the long bulk fermentation stage. To learn more about dough temperature control click here.
- Flatten the butter between sheets of non-stick paper to make it pliable. Keep in the fridge until needed.
- In a large bowl combine the eggs, yeast, salt, and sugar. Mix well to dissolve the salt and hydrate the yeast. Add the flour and mix to a dough.
- Tip the dough out on the table and knead for 10 minutes.
- Add the butter and squish it into the dough. Make sure it is broken up well and try to force it into the dough. This step will take a minute or two.
- Keep kneading using the stretch & fold method. At first it will feel loose and soggy and a couple of minutes later it will become even looser, and it will feel hopeless. Do not give up! After 15 minutes it will start becoming more cohesive. In total 30 minutes of stretch & folds will do the job. It’s quite therapeutic actually. *Desired dough temperature 25C (77F).
- Place the dough in a bowl, cover and chill for 45 minutes.
- Fold.
- Chill for another 45 minutes.
- Fold.
- Cold ferment for up to 24 hours.
- Divide the dough into 3 equal pieces and flatten.
- Rest for 30 minutes.
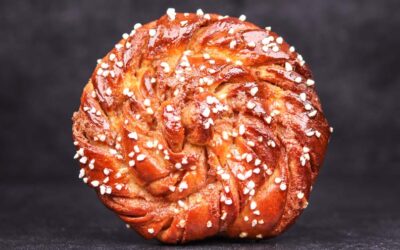
- Shape each piece into a roll. *See video.
- Place in 1kg (2lb) loaf tin.
- Final proofing time will depend on the temperature of the place you proof it in. Mine took 5 hours at around 21C (70F). You can place the loaf in a warmer area, but not too warm or the butter will leak out. No more than 26C (79F) I’d say. *During the final hour of fermentation preheat your oven to 160C (320F) fan on.
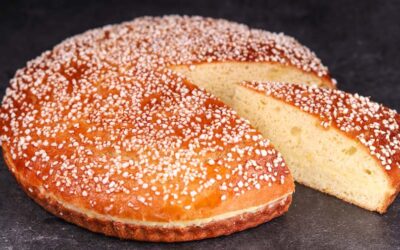
- Brush the loaf with egg and bake for 45 – 50 minutes. *If you are unsure of the doneness of your loaf, then take its temperature. If it reads above 94C (200F) in the middle, then it is fully baked.
- Leave to cool down and enjoy your ever so slightly shortened life!
Keep in mind that the conditions in each kitchen are different, so fermentation times may vary for you. It is up to the baker to control the bread and react accordingly.
Your oven may be different too, so your baking time may vary.
Watch the video here