Long bulk fermentation vs using a preferment.
This has been quite a common question under some of my ‘breads with preferment’ videos.
And it totally makes sense, as you would think – why put in the extra effort of fermenting a portion of the total flour separately and only then adding it into the final dough, mixing again and continuing fermentation? Why do this if you could simply reduce the amount of yeast in a straight-through bread dough and leave it to ferment for the same amount of time as you would the preferment?
Preferments are used to add more flavour to bread, to make the crust crispier, and the crumb more substantial. They also help with keeping quality as the slight acidity prevents the bread from going off too soon (not that it would last long before being eaten anyway).
Flour that is fermented for a longer time can also benefit our bellies as the bran and the gluten gets broken down more thus enabling our bodies to absorb them more easily and get more nutritional benefits. Call it pre-digestion. Saying that, when it comes to bread made with commercial yeast the main benefits are flavour and some of that gluten ‘relief’, let’s call it. Because a sourdough starter brings more of health benefits to our gut and helps with breaking down the flour and releasing all the goodies.
That is why naturally leavened bread is far heathier than bread made with commercial yeast. The whole dough is fermented for many hours allowing the wild yeast to break down the flour and all the enzymes to work their magic which I by no means fully understand. One thing I can say is that I am gluten intolerant and eating bread that is slowly fermented significantly reduces the effects of my intolerance. Especially if it is naturally leavened. But today we are not making naturally leavened bread. So, back to the preferment vs bulk proof discussion.
Looking at what is mentioned above we may naturally think that a long bulk proof of the whole dough should be better in every way. It seems more convenient and because all the flour is fermented it should give us the greatest benefit in terms on the qualities described above.
But not so fast! There are a few points to consider when choosing which method is best for your bake.
Points to consider.
- While a slow fermentation can add a nice acidity, it can also add too much of it and become too sour for some. Here a preferment would be more suitable in some cases as only a portion of the total flour has that sourness and it gets diluted once it is mixed with the remaining ingredients.
- Pre-fermenting a portion of the total flour will alter the texture of the final bread and give it more ‘bite’ and make the crust slightly crispier, but at the same time it will stay nice and thin. Fermenting 100% of the flour will make the bread a lot chewier. And the longer the proof – the thicker the crust. Neither of them is better nor worse. It is up to you to decide what you like best.
- The longer a dough ferments the more gluten gets broken down until the dough itself turns into a preferment and all you’ll get out the oven is a pancake. This is an extreme example, but worth considering as the longer proof will make the gluten weaker and the dough will not be able to hold much tension without spreading out when baking or tearing when you try to shape it tightly. When using a preferment on the other hand, the gluten can be strengthened because of the added acidity. This can help with reducing mixing time and help with making your bread rise more vertically instead of spreading out. But as with anything, it’s all about variables and conditions to which the baker must adapt to get to the desired result.
- The wetter the dough the more actively it will rise. The same goes for a preferment, generally. Correct temperature control can keep this in check. Higher hydration will also result in a looser dough especially combined with the long proof so some folds must be performed during the bulk proof. More on this below.
- It is riskier to ferment the whole dough as temperature control is crucial. If your dough comes out too warm or if the temperature of your kitchen goes up, then it may over-proof. This is especially challenging in warmer climates. To counteract this, you can use colder water, less yeast, or even refrigerate the flour before mixing. Now you may ask – why not ferment it in the fridge then? That is a whole other video which I will make in the future.
Using a preferment is more fail proof. It is easier to control and even if it over ferments slightly you can still use it several hours after it passed its peak. Because more yeast is added when making the final dough, we do not have to rely on the preferment to leaven our dough. The main risk is if it ferments so much that the gluten in the preferment gets broken down weakening the final dough.
There is one trick I always use when the preferment is rising rapidly or when the preferment has risen, but I am not ready to make the bread yet – refrigerate it. By cooling it down we slow down the fermentation and it is safe to leave a preferment in the fridge for a whole day and then use it. Temperature control measures must be considered when mixing the final dough because the cold preferment will lower the final dough temperature. You may need to use warmer water.
- This ties into the convenience, hydration, and temperature control points listed above. Fermenting a large piece of dough which may be at a different temperature internally than the air temperature in the kitchen may be require some folds. The surface of the dough will warm up/cool down before the centre will and that can cause it to ferment unevenly. To prevent this some folds can be performed to distribute the temperature evenly throughout the dough. Another benefit of folding the dough is to degas it so it does not get overly acidic. Lastly. If you were to make a no-knead or high hydration dough, then folds would be required for building tension. A long bulk proof method is perfect for no-knead breads as it develops gluten through autolysation. All this folding will require your attention which a preferment does not require.
Recipe specs and conclusion.
With that all out of the way, let’s do the side-by-side comparison.
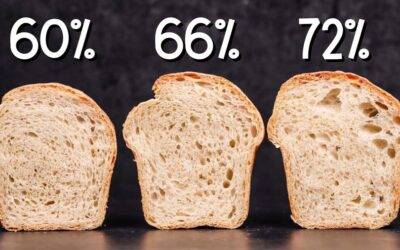
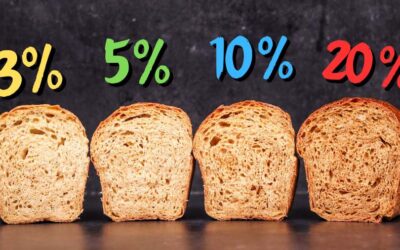
I made two breads. Both contain 230g (8.1oz) white bread flour. 20g (0.7oz) wholemeal (whole wheat) flour, 5g (0.17oz) salt. 150g (5.3oz) water. The only difference when it comes to the amount of ingredients is with the yeast. The straight-through dough contains 0.5g (0.071oz) instant dry yeast (0.2% in baker’s percentage). The one made with a preferment contains a standard 3g (0.1oz). Which is 1.2% in baker’s percentage.
To make the straight-through dough ferment slowly I significantly reduced the amount of yeast. This will extend the bulk proof to around 10 – 12 hours.
On the other hand, the bread made with preferment is made in the standard way. I mixed the preferment which is made up of 20% of the total flour in the recipe with a pinch of yeast, around 0.1g (0.004oz) and left it to ferment for around 10 – 12 hours.
The final temperature of both the preferment and the whole dough was around 23C – 24C (73F – 74F) which was the same as the air temperature in my kitchen at the time.
Once the straight-through dough had risen and the preferment was ready I continued with the next steps. The straight-trough dough required pre-shaping, resting, final shaping and a final proofing, then baking.
The preferment was added to the rest of the ingredients of the second dough and continued fermenting the whole dough for a couple of hours with a fold in between, then shaped, proofed, and baked.
They were both baked at 220C (430F) fan off using a cast iron pan with a lid for half of the baking time, and without the lid for the other half.
I also made a third dough with the same amount of flour, water, salt as the other two. But I reduced the amount of yeast to 0.2g (0.007oz), which is only 0.08%! The final temperature was 21C (70F). This was an experiment to see if I could ferment it effectively for 24 hours and to see what the difference would be.
Clearly the gluten had been broken down significantly on this one. When I did the pre-shape, it was tearing easily so not much strength would be expected from this dough. It was loose and soggy.
The final proof after shaping was quite slow too. It took around 3 hours to rise.
Speaking of extending the fermentation times to the extreme, there is a limit. Acidity created by yeast activity is the one thing that will inhibit nasty bacterial growth and mould. So, the less yeast you use and the more time it will take to start fermenting the dough the higher the chance that something else will grow before the yeast does. Saying that the 24-hour fermented bread came out pretty good. It had a nice crust, lovely flavour, and a bubbly crumb.
I hope you found some value and learned something new from this video and written article. Let me know if you have tried long bulk proofing and what your results were. If you think of something I may have missed let me know in the comments and share your thoughts.
Don’t forger to check out the ‘Steps of Baking’ and ‘Principles of Baking’ playlists on my channel for more videos like this.
Cheers!
Watch the video here