What happens when dough over ferments?
As the yeast eats through the sugars in the dough it produces carbon dioxide which gets trapped in the gluten and makes the bread puff up. The longer the dough ferments the less food there will be left for the yeast and the longer it goes the more the gluten will start breaking down.
If the yeast runs out of food before it hits the oven it will not produce any more carbon dioxide during the first few minutes of baking and the bread will not rise. Yeast only starts dying at a temperature of 50C (120F). So, when the bread goes in the oven fermentation is accelerated because of the temperature increase and the yeast will keep active and produce gas until it reaches that critical point.
If the gluten breaks down before baking (this will happen in tandem with the yeast running out of food), then the structure of the bread will be compromised. Holes could appear on the surface letting the trapped fermentation gas escape instead of holding it in and making the bread rise.
Bulk fermentation stage.
When it comes to bulk fermentation the easy answer is to let the dough double before moving on to the next step. It works for most breads.
Even if the dough is slightly over or under at this point it can be fixed moving on. The final proofing time can be adjusted to compensate.
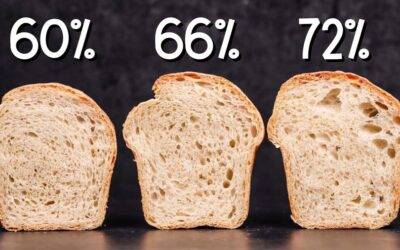
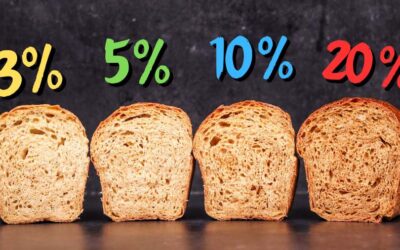
The only outliers would be very low hydration doughs or ones that are made with a higher percentage of whole wheat flour, but still have a normal hydration level. Those will not always rise as well, and we should not expect them to double in volume. By the time such dough has doubled it may just be over fermented.
Final proof is different.
Here the doubling of dough volume does not apply any more. If the dough has doubled during final proofing, then there is a high chance of it being over proofed. You want to leave some room for it to grow as it hits the oven. If it has risen to its full potential during the final proof, then it will rise no more as it bakes.
This is the trickier part because there is no way to adjust if the dough has over proofed. You must bite the bullet and bake it as it is. If it is under proofed, then you can just leave it to sit for longer.
Some doughs can be saved by turning them into a flatbread like focaccia.
It is very difficult to say how much a dough should rise before baking because different recipes will have different requirements. That is why I am not even going to try and explain this. The best thing to do is not to let it double and bake it just before that happens.
The only way to learn is by making mistakes.
The most valuable information I can give you is on how to recognize if a dough was over proofed, under proofed or correctly proofed after baking. Knowing what to look for will allow you to analyse adjust with the next bake.
You don’t have to get the bread right the first time. It is good to mess up and learn from it.
There are some tell-tale signs for each.
Under proofed bread will often have large air pockets on one side with dense dough on the other. Or even large air pockets throughout surrounded by very dense dough. This is known as ‘fool’s crumb’ as people will often mistake this for a successful bake because of all the large bubbles in the crumb.
Over proofed dough will often have a very even crumb with evenly spaced out (and relatively large bubbles) surrounded by thin membranes of dough. It can kind of resemble a honeycomb. This can also be mistaken for a successful bake. But when it comes to over proofing, then often the outside will tell a good tale too.
As the gluten breaks down the loaf will not be able to keep its shape. It may be flat or if it is proofed and baked in a tin, then the sides of it will start spilling over. It will not rise as it is baking either.
A correctly proofed dough is the happy medium. It should have a random crumb which follows the same pattern throughout. With bubbles (alveoli – sorry, but I’m not a fan of this word) surrounded by dough that is not extremely dense or extremely thin.
There are of course exceptions.
High hydration bread may have larger bubbles surrounded by denser dough, but still it should not be extremely dense, and the bubbles should be spaced out more evenly instead of just being on one side of the loaf.
Dense breads like 100% rye could have many little bubbles surrounded by thin dough. This would be a good thing since it would make the bread lighter.
Baking and taking notes of the results will make you learn and the more you do it the better you will get at it. Make the mistakes and work backwards to fix them. When it comes to breadmaking the mistakes are most often totally edible.
Watch the video here