Why Cover Bread Dough as It Ferments?
The short answer is – cover it to prevent it from drying out. And there is no good reason not to cover. But of course, there are things to consider. We all know to cover our dough so that it does not develop a dry skin on its surface which can give it an unpleasant look and texture. Some people use cloths, some use plastic wrap. There are advantages and disadvantages to both.
I use plastic wrap all the time. The main issue, and perhaps the only issue, is that it is not good for the environment. And I totally agree. Cutting down on single use plastic is a good thing. The only reason why I use plastic wrap is because I want you to see the dough rising and changing over time. I do not recommend using plastic wrap to anyone and I’m sure most of you don’t use it as much as I do.
My justification is that I get people into bread making, so that kind of off-sets my plastic use because of the positive impact of home bakers making their own bread instead of buying it in a supermarket. But maybe that’s just nonsense.
What alternatives are there to plastic wrap?
Most dough will be bulk fermented in some kind of container. Be it a tub or a bowl. Containers often come with lids, so that is the first best way to cover your dough as it goes through bulk fermentation. If your bowl does not have a dedicated well-fitting lid, then you can try and look for alternatives. I use a lid from another bowl which does not fit perfectly, but it does the job. You can also try and use a lid from a cooking pot or pan. Those often fit quite well over bowls.
What should you do when the dough leaves the bowl?
After the dough is divided, pre-shaped, shaped, and left to rest or final proof it can take on many different shapes and spread over a larger area. Obviously, we don’t have an infinite amount of differently sized lids that we can use. It is after bulk fermentation that I usually switch to plastic wrap.
A regular tea towel can be used to cover the dough. There are a couple of things you should do depending on how sticky or how dry the dough is. If the dough is wet and sticky, then you should dust it with flour to prevent the cloth from sticking to it. If it is a low hydration dough, then you may need to dampen the towel to prevent it from sucking even more moisture out of the dough.
The biggest disadvantage of the towel is that it is not see-through. Which is more of a problem for me than it should be for you.
If you are only making one loaf or some smaller rolls, then more often than not the dough can be covered with the same bowl that it was resting in during bulk fermentation. Turn it upside down to make a dome that will prevent it from drying out.
Are there cases when the dough doesn’t need to be covered at all?
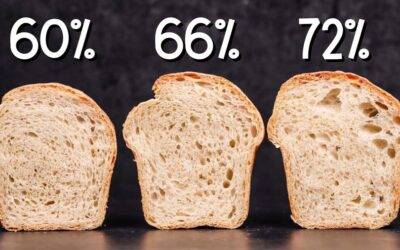
Even though a higher hydration dough may not dry out a lot it is still worth covering it. The first test in the video proved that dough does not dry out as much as one may think, but keep in mind that the fermentation times were quite short. The longer it sits uncovered the more it will dry out.
There are however times when it is not necessary to cover the dough during final proofing. One example is a focaccia which may be covered in oil. The oil prevents it from drying.
Another example is tiger bread which has a coating applied to it before final proofing. It is intentionally left uncovered to make it dry slightly.
What about cold fermentation?
Letting a dough sit for many hours or days in the fridge can present some challenges. During cold bulk fermentation it should be sealed in an air-tight container or else the surface will dry out. My bowl and lid combo does not seal that well. Even if it works during shorter fermentation at room temperature, it does not work in the fridge.
When it comes to cold proofing the same principles apply for the tea towel method. If the dough has a low hydration – dampen the towel. If it is sticky – dust the dough with flour.
Watch the video here