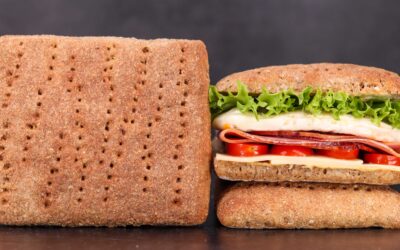
Pita was one of the first breads I made on this channel, and I thought it was about time to revisit it. This time I have simplified it so much that I doubt it is even possible to make it any easier than this. If you can come up with a simpler method, then I would love to hear it.
Lately I have been one a cold fermentation mission. Pretty much any dough can be cold fermented. Some require folding as they cool down in the fridge. Some require quite a few steps after they come out of the fridge. This however does not require any of that.
You mix the dough, divide it, shape it into rounds, cold ferment it, roll it out flat and bake it for 3 – 4 minutes and that is the pita done. So, I’m not going to waste more time tying here and we’ll just get to the recipe because you should make them right now!
Watch the video down below for detailed instructions.
Ingredients
For the dough –
125g (4.4oz) white bread flour
125g (4.4oz) whole wheat flour
5g (0.17oz) salt
2.5g (0.09oz) instant dry yeast or 3g (0.1oz) active dry yeast or 7.5g (0.25oz) fresh yeast
170g (6oz) cold water
To learn more about dough temperature control click here.
The flour I use has a protein content of 13%. If your flour is weaker, then you may need to lower the hydration.
If you are using active dry yeast, then you may need to let it sit in the water for 10 minutes before adding the other ingredients or else it could take a lot longer to raise the dough.
Method
- In a large bowl combine the water, yeast, and salt. Mix well to dissolve the salt and hydrate the yeast. Add the flours and mix to a dough.
- Tip the dough out on the table and knead it for 4 minutes. *Desired dough temperature 25C (77F).
- Divide the dough into 4 equal pieces and shape them into balls.
- Place the dough balls on to an oiled plate and rub lightly with oil all over. I used olive oil.
- Cover the dough balls and cold ferment them for 24 hours.
- Pre-heat your oven and baking tray/steel/stone to 250C (480F) fan off. The oven must be very hot, so heat it for at least 40 minutes.
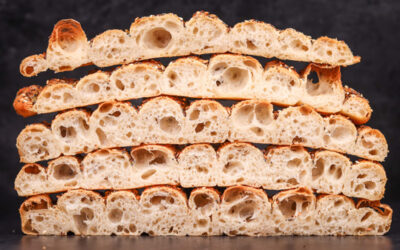
- Dust the dough ball generously with flour and roll it flat with a rolling pin. But do not make it too thin or else it will not rise well. Bake one at a time and adjust if need be. Also, note the orientation of the dough. It must face the same way as it was sitting on the plate.
- Place the flattened dough onto the preheated tray and bake for 3 – 4 minutes.
Leave to cool down a little and enjoy your pita with your favourite fillings. You can store the pita for later by cooling them down and wrapping in plastic wrap or placing them in an air-tight container. But they will always be best fresh from the oven. And the cold fermentation gives you the flexibility to bake them when you need them.
Keep in mind that the conditions in each kitchen are different, so fermentation times may vary for you. It is up to the baker to control the bread and react accordingly.
Your oven may be different too, so your baking time may vary.
Watch the video here