If you have been following me for a while you know that I like to use preferments. They improve the taste, texture and keeping quality of bread. But they add another step to the process. This is where cold bulk fermentation can come in and simplify it.
What is bulk fermentation?
We refer to the initial fermentation stage of bread dough as ‘bulk fermentation’. This is the time when the dough develops most of its flavour. The final proof is mostly there for achieving the right volume.
It is called bulk fermentation because in bakeries large quantities of dough are fermented before being divided and then shaped into individual loaves or rolls. At home we quite often make just one loaf of bread, so technically it is not bulk fermentation. But we all agree on the term and know exactly what is meant by it when we see it in a recipe.
The longer the bulk fermentation the more intense the flavour of the bread. It becomes sourer as it ferments and has a much more pronounced flavour. This is especially noticeable in naturally leavened bread which is fermented for many hours or even days. A slow fermented bread also keeps better and is not as prone to moulding.
Straight-through yeast dough can lack good flavour because it is often fermented for just a couple of hours.
Ways to delay fermentation and methods that can improve flavour.
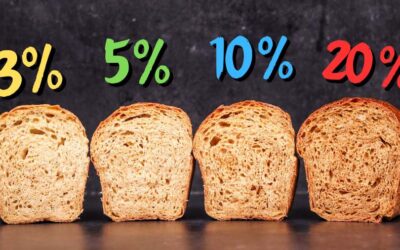
One way would be to lower the amount of yeast. A regular yeast dough is made with about 1% – 1.5% yeast. Cutting that down to as low as 0.1% can make the dough ferment for many more hours at room temperature.
Another way of simulating a long bulk fermentation is by using a preferment. A preferment is made from part of the total flour, water, and yeast of a recipe. The mix is left to ferment for a few hours or up to a whole day. Adding this to a bread dough brings a great deal of flavour and similar benefits to a good long bulk fermentation. It is also a time saver. The benefits of a long bulk fermentation are added, so there is no need to go through a long bulk fermentation anymore.
And the final method is what you clicked on this site for. Cold bulk fermentation. The dough is made with a relatively small amount of yeast and the final dough temperature is slightly cooler than normal. It is then refrigerated and left to rise and go through bulk fermentation for 12 hours or even up to a few days.
There are a couple of benefits to this method. It is convenient, especially if you want to do a mid-week bake. Make the dough in the evening, then on the next day when you come back from work take it out, divide it, shape it, proof it, and bake it in just a couple of hours.
Another advantage is that it is simpler than using a preferment. And it is quite hand-off since you do not have to be there looking after the dough as it ferments. It is so slow and takes so long that there is a very low chance of it over fermenting.
Cold bulk fermentation and retarding (cold proofing).
There is a reason why the recipes in this video are all made with commercial yeast. This may just be my opinion, but I think that cold bulk fermentation of naturally leavened bread makes no sense. Sourdough takes long to rise anyway and placing it in the fridge for bulk fermentation would extend this step to several days. Perhaps there are good uses for this method in naturally leavened bread, but I cannot think of one.
Retarding or cold proofing is a more suitable method for sourdough bread. It is a great way of slowing down the final fermentation before baking. This is also a way of making the baking process more convenient. You can make the dough and ferment it on one day and then bake it right from the fridge on the next.
So, what I am saying is that cold bulk fermentation should be used for dough that is made with commercial yeast and cold proofing should be used for sourdough bread.
It can be risky to cold proof yeast dough and there is a higher chance of it over proofing. I am not saying that it’s impossible though. If you cut down on bulk fermentation time, then perhaps it can work.
There will be a video about retarding in the future.
Any dough can be made with this method.
All you must do is adjust the final dough temperature and the amount of yeast in the recipe. I follow the same guidelines and it has always worked for me well. 1% yeast and a 24C – 25C (75F – 77F) final dough temperature.
With this method I ferment the dough for at least 12 and up to 24 hours. It can be fermented for longer, but I have never needed to do so. It seems to become less practical the longer it is fermented.
Of course, these are not rules and the dough temperature and amount of yeast will depend on the temperature of your fridge and the type of yeast you use. My fridge stays around 6C (43F) on the bottom shelf and gets warmer on the top shelf. I use instant dry yeast. You would need around 1.2% active dry yeast and 3% fresh yeast. Some yeasts do better in the cold than others. With some adjustments you will find the right amount.
There are other methods in which the dough is left to ferment for half an hour before being refrigerated. I prefer the instant refrigeration and the amount of yeast I use works well with it. If you were to leave the dough out for a while before refrigerating, you would need even less yeast.
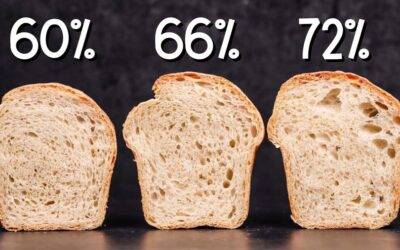
The hydration of the dough affects fermentation rate similarly when cold fermented too. So, a high hydration dough will ferment more rapidly. Ingredients work the same way too. A dough with a lot of sugar will ferment more slowly, so you will need more yeast. Same goes for dough made with cinnamon.
If you would like to use diastatic malt powder, then stick to 1% of it or less.
It is not all hands off though.
There is a little more to it than just throwing the dough in the fridge and forgetting about it. While it can be done this way, there are a couple of things to think about.
Folding. Most of the time we give our dough a fold of a few folds during bulk fermentation. It helps tighten the dough and it equalizes its temperature. The same principles apply when cold bulk fermenting. There is a huge temperature difference between the dough and the inside of the fridge. The surface of the dough will cool down a lot more rapidly than the middle, so a fold or two will help with distributing that temperature evenly throughout the dough. Equal temperature will ensure equal rate of fermentation.
I usually do a fold after 30 minutes for a low hydration dough. For higher hydration doughs I add a couple more folds at the same 30-minute intervals. If your dough came out too warm, then you can shorten the intervals and fold more often to cool the dough down sooner.
What happens after the dough comes out of the fridge.
The recipe continues as per instructions. If you are making more than one loaf, then divide the dough, pre-shape it, let it rest, do the final shaping, final proofing, and baking. There is no need to let the dough warm up. Divide it right from the fridge. It will take longer to final proof because it is cooler. Count on the final proofing time to double.
If you are making one loaf, then either pre-shape, rest, final shape, etc., or just do the final shaping right after it comes out of the fridge and proceed to the final proof. This is what I did with the pizza and focaccia in the video.
This post is getting too long, so I will keep the recipe instructions short and sweet. If you have followed me for a while, then you will not need extremely detailed explanations.
Pizza. Makes 1 x 25cm (10in) pizza.
120g (4.25oz) white bread flour
85g (3oz) water
2g (0.07oz) salt
1g (0.035oz) instant dry yeast. This is less than 1%, but the malt powder makes up for it.
10g (0.35oz) oil
1g (0.035oz) diastatic malt powder
Knead 4 minutes. Cover and refrigerate. Perform 2 folds at 30-minute intervals. Cold bulk ferment for 24 hours. Shape. Final proof 2 – 2.5 hours. Stretch, top, and bake at 250C (480F) fan off for 8 minutes.
Focaccia. Makes a 21cm x 16cm (8.5in x 6.5in) tray.
200g (7oz) white bread flour
50g (1.8oz) whole wheat flour
185g (6.5oz) water
2.5g (0.088oz) yeast
5g (0.17oz) salt
30g (1oz) olive oil (to be folded in)
Knead 6 minutes. Cover and refrigerate. Perform 3 folds at 30-minute intervals. Cold bulk ferment for 24 hours. Shape. Final proof 2 – 2.5 hours. Stretch, top, and bake at 230C (445F) fan off for 20 minutes.
Rolls. Makes 4 small rolls.
230g (8.1oz) white bread flour
20g (0.7oz) rye flour
160g (5.65oz) water
5g (0.17oz) salt
2.5g (0.088oz) yeast
Knead for 5 minutes. Cover and refrigerate. Perform 1 fold after 30 minutes. Cold bulk ferment for 24 hours. Divide, pre-shape, and rest for 15 minutes. Shape. Final proof 2 – 2.5 hours. Brush with egg and sprinkle with seeds. Bake at 160C (320F) fan on for 25 minutes.
Watch the video here