I’ve been baking a lot of rye breads lately and I’ve enjoyed the process thoroughly. Learning new things about the specific methods has been an eye-opening experience. There will be a rye baking principles video coming in the near future, but while that is not ready yet let’s talk about one of the most important principles tackled in this recipe.
Rye flour does not produce any useable gluten for capturing fermentation gases as opposed to wheat flour. Instead, rye contains carbohydrates called arabinoxylans which absorb water and turn into a gel that is able to trap fermentation gases.
This starchy gel is also responsible for keeping rye breads fresher for longer and preventing them from losing moisture and staling.
Like other grains rye contains amylase enzymes which convert starch to simple sugars which the yeast can consume, and then produce gas to make the dough rise. The conversion of starch to sugar is called amylase degradation also known as ‘starch attack’.
The issue with rye flour is that it’s a lot richer in natural sugars than wheat. More sugar means a stickier bread. If you have moderate rye bread baking experience, then you most certainly would have run into this problem. You took your nice-looking loaf from the oven, you let it cool down and were all excited to eat it. But as you tried slicing it the knife dragged and perhaps even got stuck into the gummy interior of the bread. You did not want to give up and made a sandwich that then got stuck to your teeth as you were eating it. That is starch attack, and we want to avoid it.
One of the best methods for combating starch attach is the introduction of acidity which impairs amylase activity. That is one of the main reasons why most 100% rye breads are made with natural leavening. Sourdough starters make the dough acidic.
I don’t have a rye starter yet, and you might also not have one, but there are other ways of acidifying the dough. Various liquids like buttermilk, yogurt, vinegar. Sweet syrups like molasses or honey.
Another method for combating starch attack is scalding. Amylase enzymes become inert at 80C (175F). You can find a full video on that topic here.
And it is worth mentioning that mixing wheat flour with rye will also lessen the effect of starch attack depending on the ratio of the mixed flours. The more wheat flour there is the less you need to worry about introducing acidity, scalding, or using pre-ferments.
However, this recipe is 100% rye, and I don’t have a sourdough starter. So, we will be scalding, adding some molasses, a bit of vinegar, and we will make a yeasted pre-ferment.
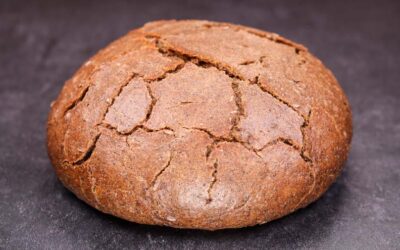
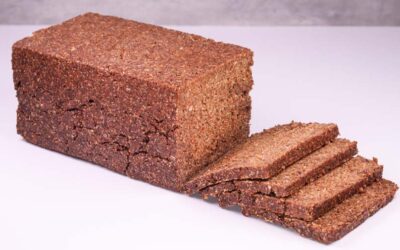
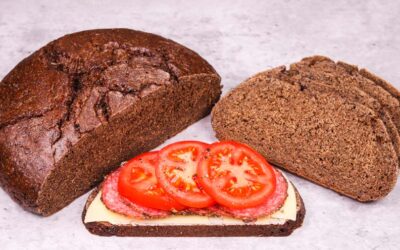
The result is a heavy, bouncy, moist, and flavourful loaf that will stay fresh for many days.
It will fit in a 2lb (900g) pullman loaf tin.
Watch the video down below for detailed instructions.
Ingredients
For the scald –
250g (8.8oz) wholegrain (dark) rye flour
170g (6oz) sunflower seeds
10g (0.35oz) salt
50g (1.75oz) dark molasses
320g (11.3oz) boiling water
For the pre-ferment –
180g (6.35oz) water
20g (0.7oz) apple cyder vinegar
Pinch of yeast
250g (8.8oz) white rye flour
To finish the dough –
40g (1.4oz) water
8g (0.28oz) instant dry yeast or 9.6g (0.33oz) active dry yeast or 24g (0.85oz) fresh yeast
100g (3.5oz) more sunflower seeds to top the loaf.
If you are using active dry yeast, then you may need to let it sit in the water for 10 minutes before adding the other ingredients or else it could take a lot longer to raise the dough.
Method
- Make the scald. Combine the wholegrain rye flour, salt, seeds, treacle, and boiling water in a large bowl. Mix well until there is no dry flour left. Cover.
- Make the pre-ferment. In a large bowl combine the water, vinegar, pinch of yeast, and white rye flour. Mix until there is no dry flour left. Cover.
- Leave the soaker and the pre-ferment for around 16 hours. If the pre-ferment is ready but you are not, then pop it in the fridge to stop it from over fermenting.
- Make the dough. In a large bowl combine the remaining water and yeast. Mix well to hydrate the yeast. Add the pre-ferment and the soaker. Mix until smooth. A mixer would come in handy, but it is totally doable by hand too.
- Scrape the dough into a greased baking tin. Wet your hand and work it into the corners making sure to press firmly. Finally, smooth out the surface and top with seeds. Press the seeds into the dough to make them stick.
- Cover and proof for 1.5 – 2 hours or until the first cracks start appearing on the surface.
- Cover and bake in a pre-heated oven at 160C (320F) fan off or 140C (285F) fan on for 1.5 hours.
- Carefully remove the loaf from the tin and place it back in the oven on its side for 20 more minutes of baking. Turn it over on other side after 10 minutes.
- Leave to cool down on a rack. Once cooled wrap it in plastic or place it back into the baking tin and cover it with a lid.
- Leave to mature for at least 24 hours. If you cut it sooner, it will be gummy.
It’s been a long time, but now you can cut your 100% rye loaf into thin slices and enjoy it for many days.
Keep in mind that the conditions in each kitchen are different, so fermentation times may vary for you. It is up to the baker to control the bread and react accordingly.
Your oven may be different too, so your baking time may vary.
Watch The Video Here