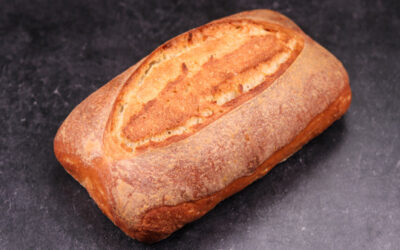
The no-knead method is here to stay, and I will keep using it as long as the breads keep turning out the way I want them to. Here is another fine example of this method. A free-standing moderately high hydration loaf that only requires a few folds and a nice tight final shape.
What is an ‘ear’ and why would you want one? An ear is a raised sharp-edged part of the surface of a loaf that is extra crispy. It is created by scoring the dough in a certain way and by baking it correctly.
A nice ear makes the loaf look great and it indicates a few things too. In order to achieve a nice ear, the dough must be correctly proofed, scored, steamed, and baked.
If the loaf is over proofed the dough will not spring open as well. If it’s under proofed, it may blow out in a different place. If the scoring is done with a straight edged tool the cut may not curl up much. Depending on the location of the cut the ear may be taller or smaller.
Steam prevents the crust from setting too soon, so plenty of moisture will ensure that the ear and the loaf are nice and big. The depth of the cut plays a big part too. Do not cut too deep! I should make a full video on this someday.
I’m not saying that the ear on my loaf is the grandest, but as far as no-knead dough goes I’m very happy with it and I know that by making little adjustments I can improve it next time.
Watch the video down below for detailed instructions.
Ingredients
For the dough –
250g (8.8oz) white bread flour
50g (1.75oz) whole wheat flour
2g (0.07oz) instant dry yeast or 2.4g (0.085oz) active dry yeast or 6g (0.21oz) fresh yeast
5g (0.17oz) salt
245g (8.6oz) water
40g (1.4oz) sunflower seeds
20g (0.7oz) brown linseeds
Use any seeds you like!
The flour I use has a protein content of 13%. If your flour is weaker, then you may need to lower the hydration.
If you are using active dry yeast, then you may need to let it sit in the water for 10 minutes before adding the other ingredients or else it could take a lot longer to raise the dough.
Method
- In a large bowl combine the water, yeast, salt, seeds, and whole wheat flour. Mix well to dissolve the salt.
- Add the white bread flour and mix to a dough. *Desired dough temperature 25C (77F). If your dough is warmer, then it will ferment more rapidly. If it is cooler, then it will take longer. Adjust proofing time accordingly.
- Cover and chill for 30 minutes.
- Fold #1.
- Chill for 30 minutes.
- Fold #2.
- Cold ferment for 24 hours. Give the dough another fold around halfway through fermentation.
- Pre-shape and rest for 20 minutes.
- Shape and place in a proofing basket.
- Final proof 1 – 1.5 hours. During this time pre-heat the oven and the baking vessel to 250C (480F) fan on.
- Invert the loaf on the hot pan and score it. Cover and place in the oven. Turn the temperature down to 220C (430F). I decided to use the fan because it has been working well for me lately. It helps to colour the crust more evenly (at least in my oven).
- Bake for 25 minutes.
- Remove the lid and bake for 10 more minutes.
Leave to cool down and enjoy!
Keep in mind that the conditions in each kitchen are different, so fermentation times may vary for you. It is up to the baker to control the bread and react accordingly.
Your oven may be different too, so your baking time may vary.
Watch the video here