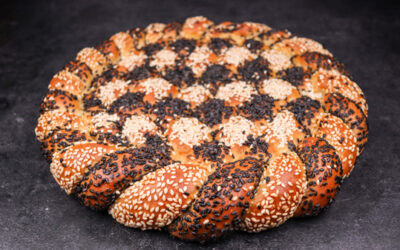
Belarusian style rye bread is a perfect example of Eastern European rye bread.
I grew up in Latvia eating this kind of bread all the time. It is super common. Of course, every town and every baker will have their own little tweaks that distinguish their bread from others, and they all take great pride in their product understandably so.
The magic ingredient is the fermented rye malt. Without it this bread will not taste the way it should. Rye malt is used not only for bread making, but also for the popular drink Kvass. It adds a distinct roasted sweet flavour kind of like coffee. In fact, there are rye bread recipes that use coffee for that reason too.
Apart from the rye malt, the technique in this recipe is super important. There are four elements which make this bread what it is.
-The preferment which will give a fermented sweet and sour flavour.
-The scald which is there to gelatinize the flour and soak the malt and caraway seeds for maximum flavour, but more importantly for a distinct springy chewy texture.
-The autolyse. This dough contains a small amount of white wheat flour and it is the only source of gluten. By autolysing it we will give the dough more structure and help it keep its shape and prevent the surface from tearing when baked.
-The paste. Before the final proof a small amount of dough is removed and mixed with water and later used to brush the surface of the loaf to give it a beautifully smoot and shiny crust.
All the ingredients have been split up in separate sections and you do not have to do any math to calculate anything. Simply follow the recipe as it is written.
This is a simplified recipe for home use. They can get a lot more involving and time consuming. We will explore this in depth in the future.
To find the rye malt search for ‘fermented rye malt’ on ebay.
Watch the video down below for detailed instructions.
Ingredients
For the preferment –
50g (1.75oz) white rye flour
50g (1.75oz) water
Tiny pinch of yeast
For the scald –
50g (1.75oz) white rye flour
30g (1oz) rye malt. You can find it here or here.
50g (1.75oz) cooked and mashed plain potato
10g (0.35oz) caraway seeds
200g (7oz) boiling water
For the autolyse –
100g (3.5oz) strong white bread flour
90g (3.2oz) water
For the final dough –
300g (10.6oz) white rye flour
10g (0.35oz) salt
30g (1oz) malt syrup
30g (1oz) water
5g (0.17oz) instant dry yeast or 6g (0.2oz) active dry yeast or 15g (0.5oz) fresh yeast
*I am using room temperature wate, which is around 22C (72F). If your kitchen is particularly cold or warm, then adjust the water temperature up or down accordingly.
Method
- Make the scald. In a bowl combine the rye malt, caraway seeds, and mashed potato. Add the boiling water and mix well. Finally add the rye flour and whisk until smooth. Cover and leave on the side.
- Make the preferment. In a bowl mix the water, pinch of yeast and rye flour. Cover and ferment for 12 hours.
- One hour before making the dough mix the autolyse. Combine the water and the flour. Mix until no dry flour left. Cover and let hydrate.
- Make the final dough. Mix the remaining water and yeast and leave on the side to hydrate. Add the salt and malt syrup to the autolyse. Mix well to dissolve any large salt crystals and to disperse the syrup evenly. Add the preferment and mix again. Add the scald and mix that too. Finally add the yeast water. Mix everything again.
- Lastly add the remaining rye flour. Using your scraper mix it together. This is where it will get a bit messy and sticky. Once you have mixed the dough until there is almost no dry flour left, wet your hand, and work the dough a little by folding the edge into the centre and going around in a circle a few times. A large bowl would be best for this. Keep wetting your hand to prevent it from sticking too much. *Desired dough temperature 25C (77F). If your dough is warmer, then it will ferment more rapidly. If it is cooler, then it will take longer. Adjust proofing time accordingly.
- Shape the dough into a ball and place it in a lightly oiled bowl. Cover and ferment for around 1.5 hours.
- Dust the dough with flour generously and tip it out on your table smooth side pointing down. Tear off 20g (0.7oz) and leave on the side in a small bowl.
- Shape the loaf and place it in a floured, cloth covered bowl or basked, smooth side pointing down.
- Add 20g (0.7oz) of water to the piece of dough that you tore off and whisk until smooth. This will be the paste for brushing the loaf with.
- Cover everything and ferment for around 1 hour or until you start seeing the first crack on the surface of the dough. *During this time preheat your oven and your baking vessel to 220C (430F) fan off.
- Whisk the paste one more time before use. Tip the dough out on a piece of parchment paper and brush it with the paste all over. Poke some holes with a chopstick or a skewer to prevent it from tearing.
- Place the dough on your preheated baking vessel. Bake it for 45 minutes. Turn it around halfway for an even bake.
- Take the loaf out of the oven and spray it with water all over. If you do not have a water spray bottle, then use a brush.
- Place the loaf back in the oven for 5 more minutes. Brushing with water will enhance the shine and make the crust nice and soft.
- Let the loaf cool down for at least 3 hours before cutting otherwise it will be gummy inside.
Enjoy! This bread will keep fresh for a long while. It will easily last a week. Slice it nice and thin and top it with your favourite toppings.
Keep in mind that the conditions in each kitchen are different, so fermentation times may vary for you. It is up to the baker to control the bread and react accordingly.
Your oven may be more powerful or less powerful than mine, so baking times may vary too.
Watch the video here