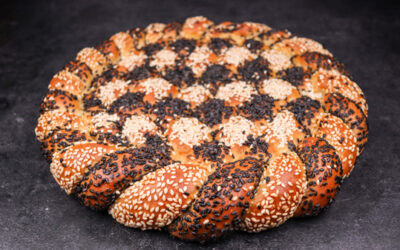
Bakarkhani or bakar khani roti is and unleavened Bangladeshi flatbread.
Made with wheat flour, slightly sweetened with sugar. It does not have any leavening agents like yeast or baking powder. The flakiness relies on layering the dough with oil or ghee. There are other recipes using molasses for sweetening and seeds for topping, but for this one I kept it simple. Of course, you can customize yours as you like.
This is commonly eaten as a breakfast snack with sweet tea. But you could certainly serve it alongside a substantial meal too.
Traditionally baked on the walls of a tandoor, which is a clay oven with hot coals inside it. The baker would brush the surface of the roti with a little bit of water to make them stick to the oven. Placing dozens of them at a time and just a couple of minutes later collecting them and peeling them off the oven walls.
A high temperature is necessary for a quick bake. I imagine most of you do not have a tandoor and neither do I. So, I would suggest using a thick metal tray to bake them on. Or use a baking stone if you have one. But do not get discouraged if you do not have either. Simply bake them on a parchment paper lined baking sheet and they should be fine.
This kind of bread can also be cooked in a pan.
Another unique recipe for the Baking World Tour.
Watch the video down below for detailed instructions.
Ingredients
For the dough –
200g (7oz) strong white bread flour
4g (0.14oz) salt
120g (4.2oz) room temperature water
20g (0.7oz) oil or ghee
10g (0.35oz) sugar
For the layers –
More oil or ghee
Flour for sprinkling
Method
- In a bowl combine the water, salt, sugar & oil. Mix well to dissolve any large salt and sugar crystals. Add the flour and mix to a dough.
- Tip the dough out on your table and knead for around 5 minutes in total. If your dough feels too sticky, then simply cover it up and leave it to hydrate for 15 minutes. During this time gluten will develop itself and make It easier to continue kneading.
- Once finished rub the dough with oil and wrap it in cling film.
- Chill in the fridge for 30 minutes. During this time, the gluten in the dough will further develop and the dough will cool down and set a little making it easier to work with.
- Rub the dough with more oil and cover your table with oil. Now stretch the dough out gradually pressing it with your fingers from the middle to the edge. Do not rush this and try not to tear too many holes in it. Stretch the dough until it becomes translucent, and you can see the table through it.
- Rub the surface with more oil and sprinkle it with flour all over in an even layer. Rub it in with your hands.
- Fold the dough sheet in half. Spread with more oil and sprinkle with flour again.
- Fold it in half again and repeat one more time. Three folds will equal 8 layers of dough. If you want it flakier you could repeat the fold again making it 16 layers, but I think 8 is enough.
- Trim the edges and cut the dough into 8 equal pieces.
- Shape them into balls. Place on a tray or plate, cover with clingfilm and refrigerate for 30 minutes. *During this time preheat your oven to 240C (465F) fan on. If you are using a thick tray or a baking stone, then preheat them too.
- Roll the dough into thin flat discs. Using your scraper cut 3 slits. This will prevent them from blowing up too much and give them a nice design.
- Bake as many as you can fit in your oven at once. They should not take more than 3 -4 minutes. You can flip them towards the end of the bake in case the bottom is not done.
Enjoy whilst fresh or cover with a towel for later.
Your oven may be different, so your baking time may vary. Keep an eye on it!
Watch the video here